Definitions
Product categories allow you to organize your product catalog and make it easier for customers to browse through your on-line store. With ProductCart you can create multiple categories and subcategories, and assign a product to an unlimited number of categories and subcategories.You can create unlimited subcategory levels in the category tree. You can also control the order in which categories and their subcategories are displayed when customers browse your store.
Let's start by looking at the following definitions:
- Root - The is a top level in the category tree. When you create a new category, you will set it as a root category unless you want it to be a subcategory.
- Categories - You can have unlimited.
- Parent Category - This is the category to which a subcategory belongs. When you create a new subcategory that it belongs to from the Parent Category drop-down menu.
- Subcategories - The process of creating a subcategory is the same as creating a category. The only difference is that you will have to specify which parent category or parent subcategory this subcategory belongs to. ProductCart supports unlimited subcategory levels.
Category-related features in ProductCart
ProductCart contains a number of features that make it easy to create a category tree as wide (number of categories at the same level) and as deep (number of sub-category levels) as you wish. Some of these features include:- Unlimited Categories
- Unlimited Subcategories
- Ability to Assign a Product to Unlimited Categories
- Ability to Import Categories in Bulk
- Different Display Settings for How Categories are Displayed
- Different Display Settings for How Products are Displayed within a Category
- Ability to Set Different Display Settings for Different Categories
- Drill-down Category Navigation
 Whilst ProductCart can happily support thousands of categories, the structure and number of categories should be carefully considered. If the customer facing pages have a fully expandable set of categories in the menus then, regardless of server performance or whatever software is being used to deliver the page, you can end up in a situation where the menu is a significant percentage of the overall page weight. If you are planning on using very significant numbers of categories then careful planning just makes good sense, as does implementing the categories in stages and confirming both customer usability and performance are not adversely impacted.
Adding a New Category
To add a new category select Products > Manage Categories > Add New Category.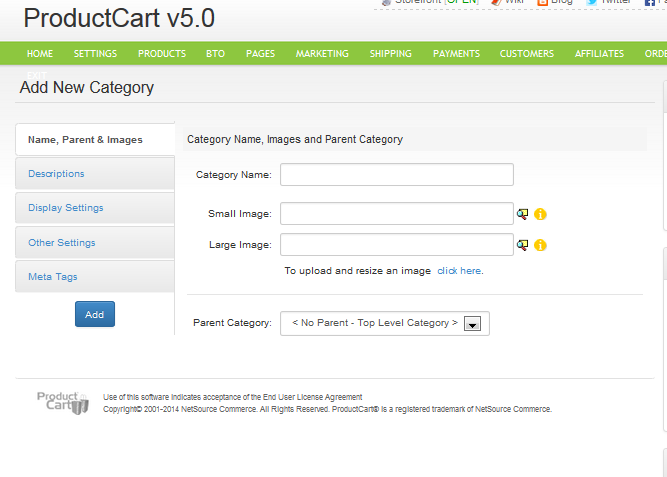
Name, Parent, & Images
- Name - This is the name that will be displayed on your store when people browse by category. This field is required
- Small Image - Enter the file name of the image file that you would like to use as the thumbnail shown when customers browse the store by category (if category images are used). We recommend that you keep category images below 100 x 100 pixels in size to allow multiple categories to be properly displayed when customers browse your store.
- Large Image - The small category image is shown on the pages where the customer is “browsing by category”, if the store has been set up to use category images (if you set up your store to only list the category names or list the categories in a drop-down, the small category image is not used). The large category image (if any) is used when the storefront is displaying products and/or sub-categories within the category. It is shown at the top of the page, above the long category description.
Category Descriptions
- Short Descriptions - If you want to provide information about the sub-categories or products that the selected category contains, enter a short description: This description field supports HTML tags and is shown at the top of the page, below the category name, on pages that display subcategories of the selected category. It is only shown when you choose a display setting that lists categories vertically in one column
- Long Descriptions - If you want to provide information about the products that the selected category contains, enter a long description: This description field supports HTML tags and is shown at the top of the page, below the category name, only on the page that displays products within the selected category.
- Do Not Show Category Descriptions - If you have previously entered category descriptions, but no longer wish to show them, check this option.
Display Settings
Choose a display option for how subcategories are displayed (if no option is selected, the default store-wide setting is used).The following settings apply when categories are not displayed in a drop-down (if empty or 0, the default store-wide setting is used) and allow you to define how many categories should be shown on each page.
- Categories per Row
- Rows per Page
Other Settings
ProductCart allows you to restrict the visibility of a category (the products that is contains are also hidden) You have two options:- Hide this Category in the Storefront - The category is completely hidden. This feature is especially important for users of the Configurator and Configurator+ versions of ProductCart in that it allows the store administrator to organize in categories, products that are not available for sale as stand alone products.
- Hide this Category in the Storefront from Retail Customers - (Wholesale Customers can See it) The category is only shown to wholesale customers or customers belonging to Customer Pricing Categories that have wholesale privileges.
 Hidden categories and hidden products: typically, if you assign a product to a hidden category, the product will not be shown in the storefront (even if you later assign it to a visible category). However, if you assign the same product first to a visible category, and then to a hidden category, the product will be visible as the “conflict” is resolved by giving the first category assignment priority over the second one
Editing a Category: Search Fields
When you edit a category, the same fields described above are presented to you. However, there is an additional tab in the left-side navigation, called Search Fields.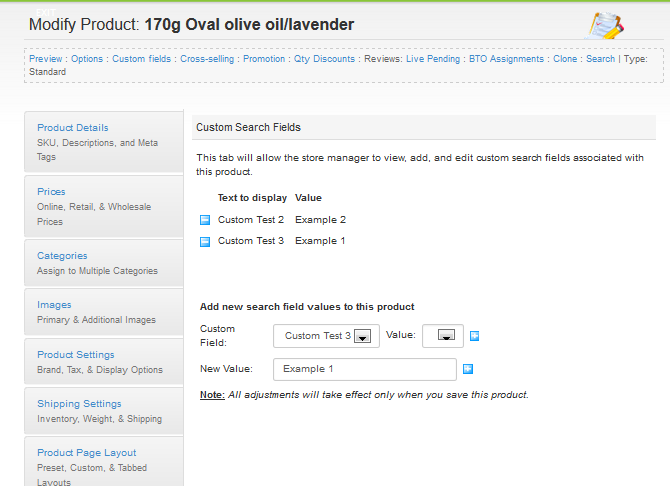
- Simply select a field and click on the + sign to associate with the category
- Click on the - sign to remove it from the list
- Make sure to save your changes because the search field is not associated with the category until you do so