Add New Product - Images
Images
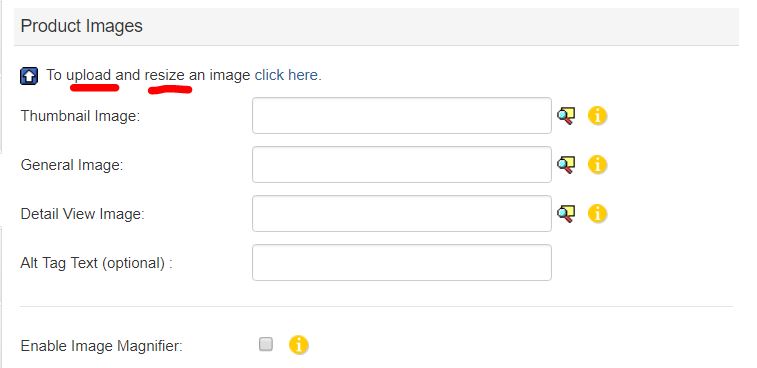
ProductCart supports unlimited product images.There are three “main” images. The Thumbnail Image image is used in product searches, when you browse the store by category and in other pages where a small product image is shown, unless you choose a display setting that does not use product images. The General Image is shown on the product details page. The Detailed View Image is opened in a separate window to provide a closer look at the product.
Recommended Sizes
- Thumbnail Image - Recommended Size: Smaller than 100 X 100 Pixels. Do not enter any directory path, just the file name.
- General Image - Recommended Size: Smaller than 200 X 200 Pixels. Where the image is shown on the product details page (left, right, center) depends on the Display Settings that you have chosen for the page. These are set store-wide, at the category level, or even at the product level.
- Detailed View - Enter the file name for the product's detailed view image. If you specify a Detailed View Image, a zoom button is shown on the product details page, below the General Image. When a customer clicks on it a new window pops up and resizes itself automatically to properly display the new image.
How to Upload Images
ProductCart assumes that all images used for products and categories are uploaded (or will be uploaded) to the directory pc/catalog on your Web server. There are three ways to upload an image to your store:- Upload previously edited images via the Upload Images feature
- Upload previously edited images via FTP. To upload images to your server you can also use any FTP program. This is the recommended method if you are planning to upload a large number of images at the same time.
- Upload unedited images via the Upload & Resize.
 The Upload & Resize Feature
The Upload & Resize feature allows you to take one image, and automatically create the thumbnail, standard, and detail view images for your products (it also works with category images). This feature can save you a significant amount of time when adding new products and categories to your store. It’s one the most popular features among ProductCart users.
 The Upload & Resize feature is only available when your Web server has the software components that are needed for it to work. Also, if your site is hosted on a server running a 64-bit Operating System, your host will need to install and register the 32-bit components in the WOW64 Directory and assign the necessary permissions. We have been told that it is also necessary to place your site in a 32-bit Application Pool as well, but check with your individual host for more details.
When adding, cloning, or editing a product, select the upload & resize text link to load a window where you can enter settings specific to the task.
- Enter the width for the thumbnail image (100 pixels or less recommended)
- Enter the width for the general image (200 pixels or less recommended)
- Enter the width for the detail view image (any size). Note that if the source file's physical width is smaller than the width you enter in this window, your entry will be ignored and the image will not be resized.
- Select an image file (GIF, JPG, JPEG, JPE, PNG) on your system using the Browse button. If your server has AspImage installed, GIF files are not supported.
- Select whether or not you would like to sharpen the image after resizing it.
- Click on the Upload button to start the upload & resize process.
A progress bar will show you the file being uploaded to the server. When the process has ended, you will be shown the three new image file names, hyperlinked to the images themselves. Click on any of the links to see the images. At the same time, ProductCart has also populated the three image input fields on the page with the newly created file names. Close the window to return to the Add/Modify Product page.
Behind the scenes, the upload & resize utility performs the following tasks:
- Uploads the source image to a temporary directory in the includes folder called uploadresize. The source file is automatically deleted from this folder after these tasks are completed.
- Creates the three files mentioned above, adding a descriptive suffix to the file name to differentiate them. The files are then saved to the pc/catalog folder.
- Copies the file names to the input fields on the page from which the utility was launched (i.e. add/clone/modify product pages).
Common problems: If you are having problems with this feature, errors might be occurring, but they might be hidden by ProductCart’s “error trapping” code. A very common source of problems is the fact that the license of the components used for this feature has expired. Please ask you Web hosting company to confirm that the licenses for the image components are current. See the note below about which image components are necessary. Another common source of problems is that folder permissions are not properly set.
Locating an Existing Image
If you know that the image that you would like to use for any of the image fields shown on the add/modify product page is already on the Web server click on the search icon to graphically browse through the images in a pop-up window.Searching for an image requires that you first index your image directory (the pc/catalog folder). You should perform this task every time you have uploaded new images to the store. If you cannot find an image that you know is there, try running the indexing feature again. Depending on how many images are stored there, indexing may take from a few seconds to over a minute.
Click on the Index Now button to create a searchable index of all the images contained in the folder. Once your pc/catalog folder has been indexed, the image search feature will allow you to easily locate images in the folder. Use any of the filters on the page to narrow your search.
An AJAX-driven search preview tool will tell you how many results your search will return, so you can adjust your filters before actually performing the search.
On the search results page, click on an image or image name to view its actual size. Images are automatically resized to better fit into this window, and therefore may appear distorted. Click on the Select button to copy the image file name to the image field that was next to the search icon that you originally clicked on to start the search.
