Overview
The Setup Configurable Products or Services page in the Control Panel is shown when you locate a Configurable Product and click on Configuration. This page is the core of the Configurator system in the ProductCart Control Panel. It gives you all the tools you need to closely define your store visitors' experience when customizing the selected Configurable Product.
The following is a description of the features/settings found on the page. All settings on the page are set at the category level. That is: for each category of selectable items (see Selectable Items and Additional Charges for the difference between the two). Please use the following graphic as a legend.
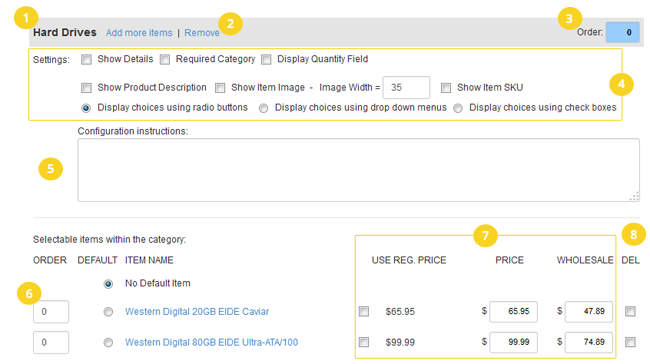
1 - Category Name
This is the name of the section of the configuration page that will list the items available for selection. Take advantage of hidden categories to show on the configuration page categories that are not shown elsewhere in the storefront (some category names might only make sense when shown on the configuration pages in the storefront).
2 - Category Edit/Remove
Add more items
Use these links to add items to the category, or remove the category completely. To add items to the category, products must exist in the category itself that are…- eligible for being listed as a selection (e.g. a Configurable Product is not eligible for being listed as a selection for another Configurable Product's configuration page)
- not already listed in the category (i.e. the same item cannot appear twice)
Therefore, you will often find yourself adding products to a category, then returning to the configuration page to add them there. Open a new browser window/tab to do so without closing the configuration page.
If you wish to add a new category, click on the Add a Category link located at the top of the page or the Selectable Items - Add more link just below it. This will take you to a page where you can add an existing category to the configuration. If the category you wish to add to the configuration doesn't exist yet, click on the Add Another Category button on that page to be redirected to add a category to the store. Keep in mind that until that category has products in it, it will not appear in the options to Add a Category to the configuration.
Remove
This feature allows you to completely remove a category from the configuration. The same occurs when you remove all items within the category.3 - Category Order
Show Details
When you added Standard Products and Configurable Items to your store database, you probably entered descriptions, product images, etc. Check this box if you would like your customers to be able to click on a “View Details” text or image link, which will show such information nicely organized in a pop-up window.You can control the look of the “View Details” pop-up window under Products > Manage Configurable Products > Product Configurator Settings. Offering additional information on the available options may help your customers make better selections and reduce customer service inquiries.
For example, while configuring a custom PC, customers may want to find out more about the different features of the CD-ROM drives available for selection, without having to leave the page. The “View Details” window would contain descriptions and images for those CD-ROMs.
Required Category
If you check this box, the customer will be required to choose at least one item from that category. For example, a computer doesn't work without at least one hard drive, so you would want to make hard drives a required category. Make sure that you select a Default Item when you set a category as required: you cannot set a category to be required without setting a default item.Display Quantity Field
Check this option if you want customers to be able to order multiple units of a selectable item within the category (or of any of the selectable items within the category, if the category is set to allow multiple selections).You can hide or show the quantity field for any category shown on the first page of the product configuration. You cannot show the quantity field for Additional Charges show on the second page of the product configuration, since by definition these charges are not a function of the quantity ordered.
If this option is not checked, then ProductCart will automatically add 1 unit of a selected item to the product configuration, and the customer will not be able to increase that number. If a customer orders 3 units of a certain item, and 2 units of the Configurable Product to which the item has been assigned, this means that the customer is actually buying 6 units of that item. This is important to keep in mind in order to understand how quantity discounts are calculated on the product configuration page. Please refer to the next section for more information.
Show Product Description
When this option is checked, the Short Description (if any) for the items in the category is shown next to the item name. This makes this information immediately available on the page, without having to click on the “More Details” link (or button).However, this option is not recommended when there are many items listed in the category and it can substantially increase the amount of information displayed on the configuration page.
Show Item Image
You can show a small thumbnail of any item that does have a product thumbnail. Since the product thumbnail could be too large for this purpose, you can force the image width. The default size is 35 pixels. You can change it by using the Image Width input field.Show Item SKU
You can show the item's part number (SKU) by checking this option.Display Choices
This feature changes the way products are shown on the page, and how many of them can be selected. You have three options:- Display choices using radio buttons
- Display choices using drop down menus
- Display choices using check boxes
When you choose to Display choices using check boxes, all products in the category will be displayed as a list with check boxes, allowing the customer to choose one or more of the items. When using radio buttons, items are also displayed in a list, but only one selection is allowed.
Going back to the example used above, you may allow a customer to select more than one software package or peripheral for their custom built PC.
Even when you check the Allow Multiple Selections option, you can define a default item for the category and you can set whether the category is required or not. If the category is not required, customers will be able to uncheck the default item (if any). If the category is required and they uncheck the default item,, they will be asked to check at least another item from the available selections.
5 - Category Instructions
You can show category-specific instructions on the configuration page. Use this feature to coach your customers while they are configuring the product. This is especially useful for new customers, who may be a bit intimidated when faced with a long product configuration page.
You can use basic HTML tags to add special content to the field, including link to images and other files (e.g. a link to a PDF file, or another page on your Web site, etc.).
6 - Item Order
Enter numeric values to control the order in which items appear within the category. For example, you may want to sort Hard Disks by their capacity, or sort monitors by their screen size, etc. By default, items are sorted alphabetically by product name.
7 - Prices
Main Prices
- Regular Price – This is the price that the product is sold for as a stand-alone product. You can opt to use this price, or enter new prices as mentioned below.
- User Regular Price – Check this box if you want to use the Regular Price as the Retail Price for this item. Otherwise, enter a different price in the Price field.
- Retail Price – Enter the price that you would like to use if you elect not to use the Reg Price value. For example, this is often the case when merchants decide to charge a price that is lower than the list price for the product, since the customer is purchasing it as part of larger order.
- Wholesale Price – Enter the wholesale price if you elect not to use the default wholesale price that you had defined for this product when adding it to the store database.
Configurator and Customer Pricing Categories
If your store is using Customer Pricing Categories (e.g. “Preferred Customers”, “International Resellers”, etc.), a Show icon appears next to each item (not pictured). Click on it to display and edit the pricing category prices at the item level. Click on Hide to hide them.Being able to set prices at the time level for each pricing category gives you a tremendous amount of flexibility when selling configurable products to different types of customers.
8 - Remove Item
If you wish to remove an item from the category, check the box on the right under the "DEL" (delete) column. Then scroll down to the bottom of that category and click the "Delete Selected" button.
If you delete all items within a category, the category will be removed from the configuration. When you delete an item, you are actually only removing it from the list, and you can always add it back. You are not deleting the product or item from the store database.
Other Settings
- Item Name
The item name comes directly from the products catalog. This is the name of the Standard Product or Item as you entered it at the time you added those products to the database.
- Default Item
Select the Default option to make this the default selection for your configurable product. This allows you to create a “suggested” configuration for your Configurable Product or service.
For instance, you could be offering five types of paper as part of a configurable printing service, and may want to suggest to your customers that they print their document using medium-quality paper. Customers will be able to either accept your default selection, which will be displayed when they start configuring the product (unless the Hide Default Configuration option has been selected when adding or modifying the Configurable Product), or select another one (e.g. a cheaper or more expensive type of paper). The price difference will be shown next to the item, together with the words “Add” or “Subtract” and the monetary value.
When you make default selections, the prices associated with those items are added to the product's base price. The result, called the Default Price, is shown on the store instead of the base price for the product. The Default Price then changes dynamically based on the customer's selection. If there are no default items, select the No Default Item check box. No selection will be added to the default configuration. If there are no default selections, then the Default Price equals the Base Price for the product.
For performance reasons, the “default price” for a Configurable Product is no longer calculated in real-time in the storefront, but rather calculated in the Control Panel and saved to the database. To “refresh” it, locate a Configurable Product, click on “Configuration” and update the page.