PLEASE NOTE:
- This "standalone" upgrade is for ProductCart versions 5.2.1 and newer. If your store is running a version older than v5.2.1, then you will need to upgrade your store to a newer version before continuing.
- If you are already using or have upgraded to the NEW PayPal Commerce Platform , this upgrade is included and doesn't need to be installed again.
- To learn more about the PayPal Commerce Platform integration, read this article: https://productcart-kb.nsource.com/kb/paypal-commerce-platform-ga4-integration
To SKIP installation instructions, scroll down to "What’s New with the GA4 / GTM Update? " section or click here to see features and how to use them.
Where to Find the Update & Update Instructions
In your control panel click “HELP” on your main navigation, then “Check for Updates.”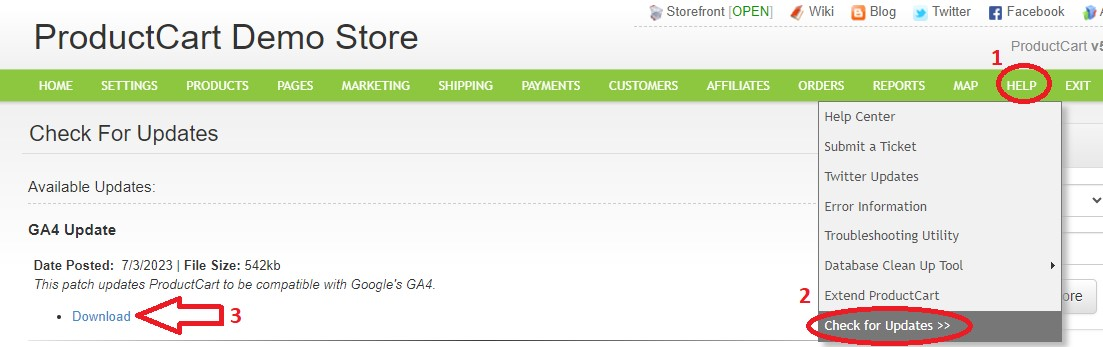
After you download the upgrade file, unzip the file on your device or server.
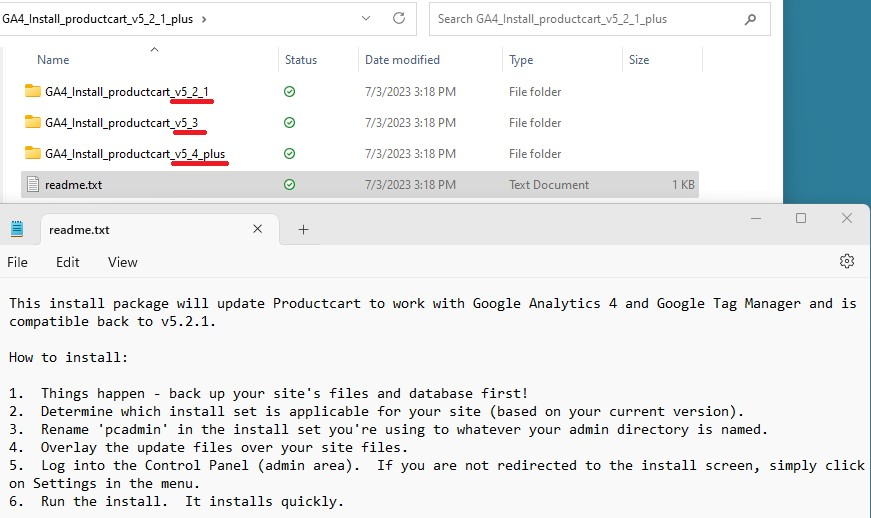
You’ll notice 3 different file sets which correspond to the latest versions of ProductCart. If your version is older than v5.2.1 this update will NOT be compatible with your ProductCart store and an upgrade is recommended.Follow the instructions on the readme.txt file which are:
- Things happen - back up your site's files and database first!
- Determine which install set is applicable for your site (based on your current version).
- Rename 'pcadmin' in the install set you're using to whatever your admin directory is named.
- Overlay the update files over your site files.
- Log into the Control Panel (admin area). If you are not redirected to the install screen, simply click on Settings in the menu.
- Run the install. It installs quickly.
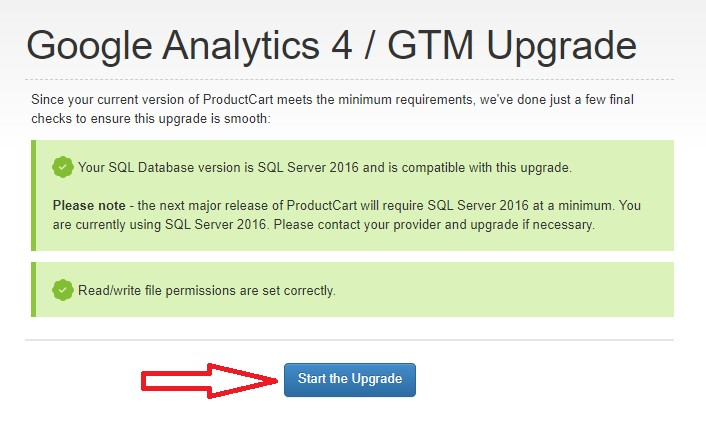
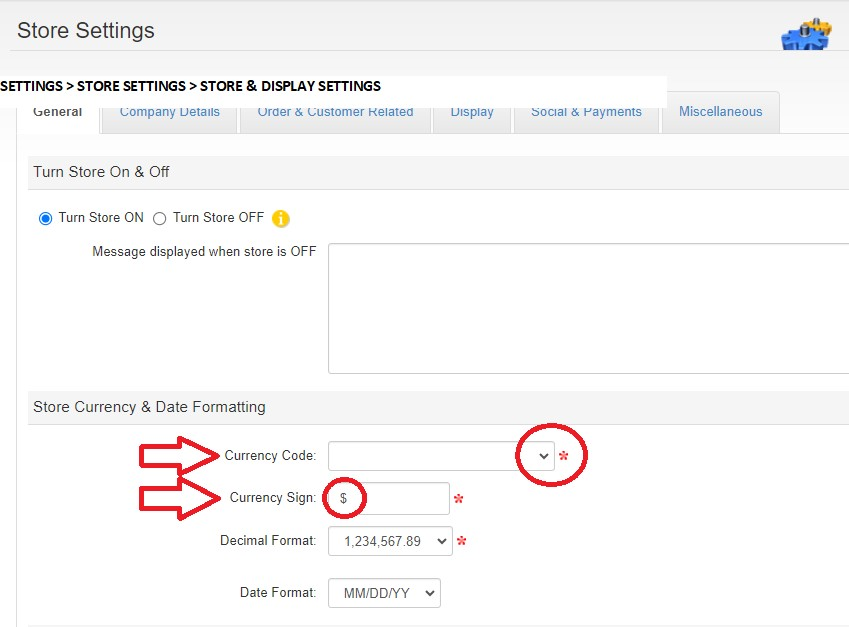
Once the files are overlayed successfully and you log in, you’ll see this screen when you log back in OR when you click on SETTINGS > STORE SETTINGS > STORE & DISPLAY SETTINGS
Click “Start the Upgrade” button.
When upgrade is completed, you get a screen that looks like this and has a message that says “Google Analytics 4 / GTM Upgrade – Completed.”
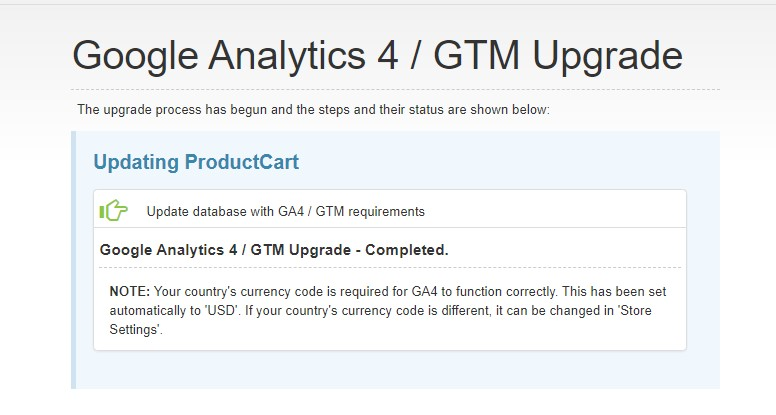
PLEASE NOTE: Your currency code and sign may need to be changed. You'll find this under SETTINGS > STORE SETTINGS > STORE & DISPLAY SETTINGS > General Tab > Store Currency & Date Formatting. Here you can verify that your store is using the correct CURRENCY CODE and SIGN. Always click “Save Settings” after you make changes!
What’s New with the GA4 / GTM Update?
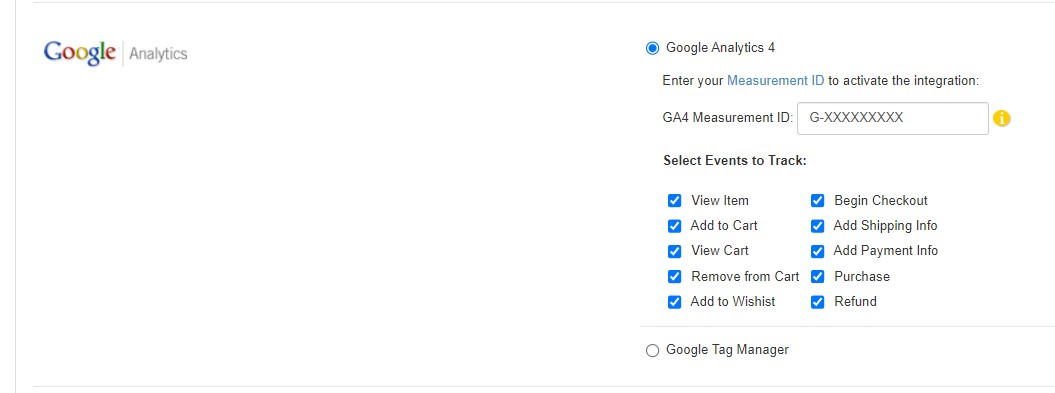
With the new Google Analytics 4 (GA4) and Google Tag Manger (GTM) update, you have the choice to use exclusively GA4, OR, you can continue with your GTM tracking using your current container. You will need either your GA4 Measurement ID, OR, your GTM container ID to activate tracking on your ProductCart store through the control panel.
All ecommerce events are programmatically called through your ProductCart store as customers shop, click, and buy products. Once Google Analytics or Tag manager is activated, these ecommerce events will show within 24-48 hours on your Google Analytics dashboard under Ecommerce Reporting.
Where is the New with the GA4 / GTM Update?
You’ll find the Google Analytics settings in the same place as before by clicking SETTINGS > STORE SETTINGS > STORE & DISPLAY SETTINGS > Miscellaneous Tab > Scroll Down to the Google Analytics Section. Just add your GA4 Measurement ID in the appropriate box as seen in the screenshot. Click the radio option for Google Tag Manager to use your container ID for GTM tracking.
PLEASE NOTE: In GTM, you will have to specify which events you want sent to Google Analytics through your ecommerce tag and trigger settings (see bottom of article). All events will be available by default when using GTM and don't have to be checked on the control panel.
What Events are Tracked through the New with the GA4 / GTM Update?
These are the events available to select and track within your ProductCart store. You can select all, some or none depending on your preferences.
View Item – Each time a product pageview is loaded. This doesn’t include categories. ONLY individual product pages count.
Add to Cart – Any time a product is added to the cart or when any product is incremented in quantity within the cart.
Remove from Cart – Any time a product is removed from the cart or when any product is decreased in quantity within the cart.
View Cart – Any time the shopping cart page is loaded or reloaded when changes are made to the cart.
Add to Wishlist – Any time a registered customer clicks and successfully adds a product to their wishlist. This will not work for guest customers.
Begin Checkout – Any time the One Page Checkout is initiated.
Add Shipping Info – When a customer adds shipping information and clicks continue in the One Page Checkout.
Add Payment Info - When a customer selects a payment method and clicks continue in the One Page Checkout and continues in the checkout process.
Purchase – When a customer completes an order after payment method is accepted.
Refund – This happens whenever a refund is recorded through the Google Analytics Adjustment s found on the ORDERS dropdown on the main navigation. This is not mandatory to do for refunds, however, is a helpful way to track losses in Google Analytics when refunds occur.
PLEASE NOTE: The event checkboxes are ONLY are available for the GA4 implementation. If you use GTM tracking, all events will be enabled by default and if you follow these instructions for setting up a Global Ecommerce Tag in GTM, you can customize the trigger to include or exclude ecommerce events.
<h3 id='#gtm-setup">Setting Up Global Ecommerce Tag in Google Tag Manger - For Google Tag Manager ONLY!</h3)
NOTE: You will need a Google Configuration Tag set up for your ProductCart store.
Read this article for more info on Google Configuration Tag -> https://docs.productcart.com/link/article/using-google-analytics-with-your-productcart-powered-store2
TAG INSTRUCTIONS
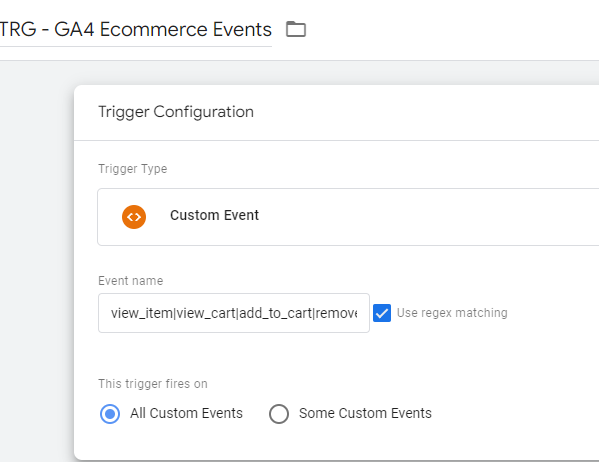
- Create a NEW GA4 Event Tag in Google Tag Manger. Pick a name like "GA4 Ecommerce Events."
- Enter in your GA4 Measurement ID to send these events to your Google Analytics account.
- For Event Name, use this the variable
- Click the Drop-down for "More Settings"
- Check the box for "Send Ecommerce data" and make sure "Data Layer" is selected for Data source.

- Create New "Custom Event" Trigger
- Under Event Name, paste the following exactly (no spaces) to catch ALL events: view_item|view_cart|add_to_cart|remove_from_cart|add_to_wishlist|begin_checkout|add_shipping_info|add_payment_info|purchase|refund
- Check "Use regex matching"
- Select "All Custom Events" for this Trigger fires on.
Save Trigger + then Save the tag. You will need to PUBLISH your changes on Google Tag Manger for them to take effect on your store. Make sure you select " Google Tag Manager" on the ProductCart Control Panel under SETTINGS > STORE SETTINGS > STORE & DISPLAY SETTINGS > Miscellaneous Tab > Scroll Down to the Google Analytics Section and use your proper GTM container ID. 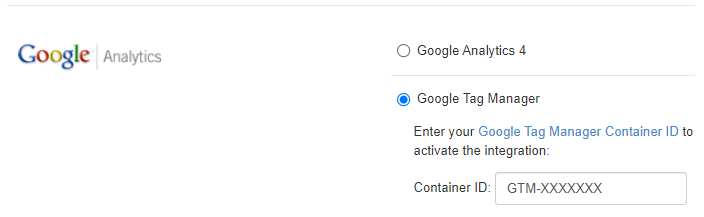
That's it, you are ready to start tracking in Google Analytics 4!