 The Category Import Wizard allows you to import category information into your ProductCart-powered store, allowing you to potentially add hundreds of categories to your store database in a few, easy steps. You will be able to quickly import categories, sub-categories, and all of the many category-specific settings supported by ProductCart.
Preparing for the Import
Properly preparing your category database file prior to importing it into ProductCart can save you a lot of time (and headaches). Because many of the instructions are identical when importing a product database into ProductCart, in the following paragraphs we will sometimes refer to the Product Import Wizard documentation.You can import from the following file types:
- Microsoft Excel (*.xls)
- Comma Separated Value (*.csv)
Importing a customer database into ProductCart requires the following steps:
- Properly formatting your file. The steps to be taken are different depending on whether you are planning to use a *.xls or *.csv file.
- Uploading the file to your server. You can either use the built-in upload feature or FTP the file to the catalog subfolder within the pc folder.
- Specifying whether you are importing new categories or updating existing categories.
- Mapping fields from the file to ProductCart's database.
- Confirming mapped fields.
- Performing the import
- Reviewing which records could not be imported and why.
ProductCart's Category Import Wizard will guide you through the process step by step, as explained later in this section. First, however, you will have to spend a little time formatting the file so that it can be seamlessly imported into ProductCart.
Formatting Your Import File
Regardless of which file type you plan to use during the import, it is very important that you make sure your file is formatted properly prior to importing into ProductCart.Preparing an Excel File for Import
If you are importing an Excel file, the following steps MUST be taken in order for the import to be successful.- "Clean up" the spreadsheet:
- Remove all other worksheets
- Remove all cell formatting
- Remove all empty columns
- Remove all columns that you do not intend to import
- Remove all empty rows
- Create a name for the data range:The Excel import feature requires a named range and the range must be named “IMPORT. To do this, select (highlight) the entire data range (columns and rows) that you want to import (including the top row, which should contain the field names), and then
- Office 1997 to 2003: Select Insert > Name > Define > Enter the name "IMPORT" with quotes and click the Add button
- Office 2007: Select Formulas > Define Name >Enter the name "IMPORT" with quotes and click on the OK button
- Save the .XLS file
The vast majority of technical support requests that we receive from users of ProductCart that are not able to successfully import an XLS file are due to improperly setting the IMPORT range. If you are experiencing problems, please review the steps outlined above to make sure that the IMPORT range has been properly defined.
Categories and Sub-Categories
Order categories in your spreadsheet by category level (parent categories at the top, then sub-categories) because ProductCart cannot assign sub-categories to a parent category if the parent category was not imported before the sub-categories that refer to it.
In other words, you need to tell ProductCart to create a subcategory, before you can use it as a parent. When you create the subcategory in your import document is completely irrelevant, as long as you do so before you use it as a parent category. For example, you could:
- create all level 1 categories - then create all level 2 categories - then create all level 3 categories
… or you can do it for each category tree “as you go” (parent 1, sub-categories of parent 1, parent 2, sub-categories of parent 2, etc.).
Order File Preparation Notes
If you are importing a CSV file, do not use double or single quotes at the beginning of any field.When importing new categories, you cannot map the following fields:
- Category ID, as it does not yet exist in the database
- Featured Sub-Category Name
- Featured Sub-Category ID
Whenever you want to update category names, always use the “Category ID” field to match the existing categories.
Verify Field Requirements
Carefully review the requirements for each field - specified in the next section - so that you will not run into conflicts when mapping the fields.Rename the column headings so that they can easily be recognized when mapping the fields.
Field Requirements

New Categories
You will notice that there is no “Category ID” column as the ID is not known before the record is created into the database. The same is true for the “Parent Category ID”. When the “Parent Category ID” is not there and the “Parent Category Name” is empty, the new category is created in the root. The columns “Featured Sub-Category ID” and “Featured Category Name” are also not present as we assume that you are importing new categories.
Update Existing with Names
Here we assume that you are updating existing category information, matching the existing categories based on their name. If you have categories that share the same name, you should not use this method and instead use the category IDs.
Update Existing with IDs
Here we assume that you are updating existing category information, matching the existing categories based on the category ID. So the most important column in this spreadsheet is the first one, “Category ID”. Other information within a certain category can also be updated using the category ID. For example, to indicate which sub-category would become “Featured”, you can use the “Featured Sub-Category ID” column.
Use (3) if you wish to update existing category names. That is: ProductCart will match the existing categories using the category ID, then will use the “Category Name” field to update the category names.
When you are updating information, you might only be importing one or two columns in addition to the column used to match the existing categories (Category Name or Category ID). For example, you might import a spreadsheet with “Category Name” and “Display Products” to change the product display settings for the imported categories. When you do so, remember to remove the columns you don’t need.
Category Import Steps
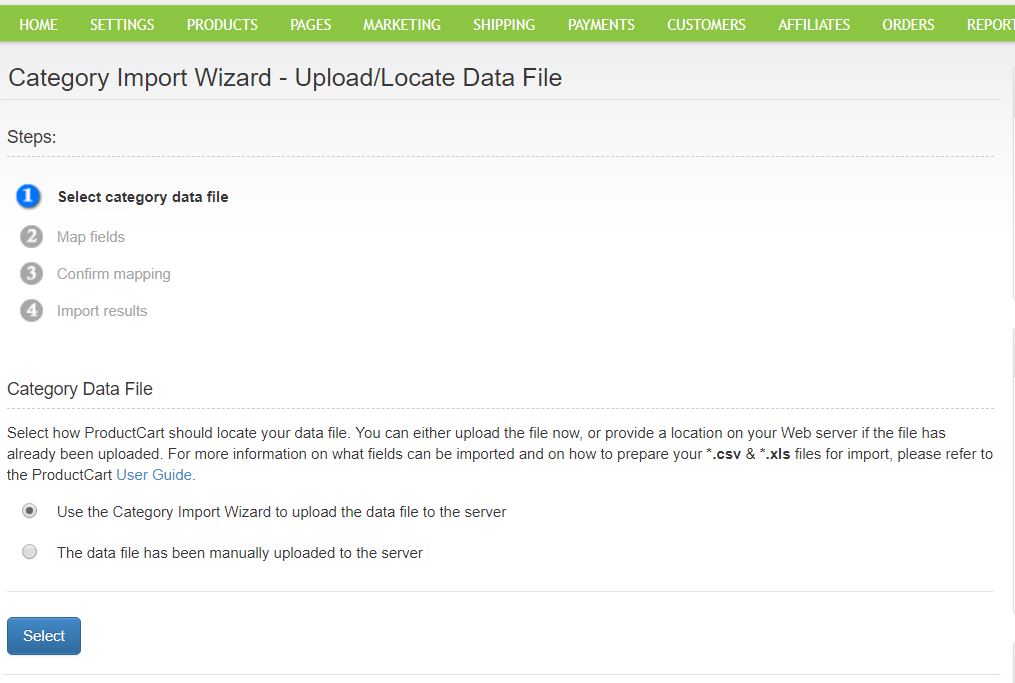
Step 1- Upload the file
 Now that you have prepared your MS Excel or CSV data file for importing it into ProductCart, select Products > Import Categories to start the Category Import Wizard.
You can either upload the data file through the Import Wizard or via FTP (recommended for large files). If you choose to upload the file through the Import Wizard, browse to the file and then click on the Upload button.
If you prefer to use the FTP, you must place the file in the following folers: "pc/catalog" and then enter ONLY THE FILENAME in the filed provided. ProductCart will verify that the file exists on the server before proceeding to Step 2.
Once the file has been uploaded/located successfully, the Category Import Wizard will ask you to choose whether you intend to import new category information to the database, or update existing categories.
Step 2- Map the Fields
The next window allows you to easily map fields between the two databases. Your import file's column headings are listed on the left side and ProductCart's on the right. Carefully map each field. Leave blank the ones for which you do not have any information to import.
ProductCart saves the current mapping preferences so that you don't have to remap all the fields in case to need to import data from the same file (e.g. you may use the same Excel spreadsheet multiple times to regularly import new category data from another application).
Make sure that you don't map the same field twice. If you do so, ProductCart will return an error message and will prompt you to verify that all fields are mapped uniquely.
Step 3- Confirm Mapped Fields
Next, ProductCart shows you the fields as you have mapped them. Verify that the information is correct, and then proceed to the next step. Otherwise, go back to Step 2 and change the incorrect mapping settings. ProductCart will now start populating the database. Depending on the number of records that you are importing, this task may take several minutes.Step 4- Import Completed
Once all records have been imported, ProductCart will display a report that lists the number of records successfully imported, those that could not be imported and why. For example, you will be shown a list of categories that could not be imported due to the fact that a match to the parent category could not be found.
To visually confirm that the import was successful, select Manage Categories and look for categories that you have just imported (you can use the search feature to easily locate a specific category).
Undoing the Last Import/Update
ProductCart allows you to easily “undo” an import/update by reverting back to the data that was stored in the categories table before new data was imported or updated.
When category accounts are imported or updated, ProductCart saves a log of what information was imported in the file importLogs/catlogs.txt. The system uses this information to remove the data that was imported/updated.
To “undo” the last import/update, select Import Categories from the Manage Products menu, and then click on the Undo Last Import or Undo Last Update button. Note that the button is only visible once you have imported or updated categories. The “undo” can only be applied to the last import or update. It cannot be applied to previous imports or updates.
Note that this feature is not a substitute for backing up your store database before importing or updating data. Backing up your database remains the safest way to ensure a quick recovery in case the database is compromised during an import or update procedure. That's because the “undo” feature is script-based, and therefore any glitch in the way the script runs (e.g. a server problem at the time the script is run) could prevent you from returning exactly to the status in which the database was in before the import was executed.
Updating Data within an Existing Store Database
You can either import new categories or update/append existing categories. Adding sub-categories to existing categories falls under importing new categories. If you wanted to change the display settings, instead, you would be appending data (i.e. changing existing records in the categories table).
If you wish to update/append data, select that option during the import procedure: the Import Wizard will prompt you to make a selection after you have uploaded your data file to the system.
ProductCart can use either the category ID or the category name to match the data that you are importing to an existing category.
Back-up Recommendations
To ensure that you can quickly revert back to the way your store database was structured before performing an import or update, we strongly recommend that you ALWAYS BACK UP your existing store database before performing an import or update procedure.
If your store uses a MS Access database, you can simply download the *.mdb data file to your computer. If your store uses a SQL database, inquire with your Web hosting company about how you can have your database backed up and restored.
This is especially important when you are importing or updating a large number of categories. The “Undo” feature discussed above is not a substitute for having a good back-up policy.