Overview
Busy stores that process a large number of orders every day will appreciate this feature. It allows you to quickly import 'Order Shipped' information into your store, so that customer accounts can be quickly updated with details on how and when the orders where shipped. In addition, customers are automatically notified via an “Order Shipped” e-mail.
This feature can save you a large amount of time when you are shipping your orders using another application, but still to update your online store with some of those details (e.g. tracking numbers so that they appear as part of the orders). All you have to do is export shipping information from the system that you are using to process the shipments, and import it into ProductCart as explained below.
What happens after you import
When order information is correctly imported, ProductCart will automatically do the following:
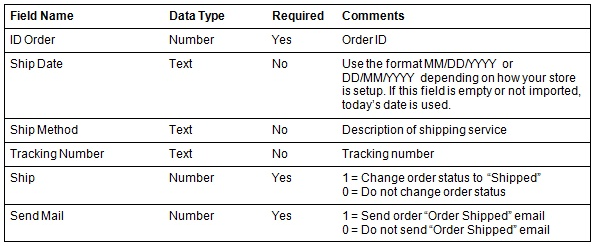
- Update the shipping date with the one provided in the imported file. If none is imported, today’s date is used.
- Update the shipping method with the one provided in the imported file (e.g. UPS Ground). If none is imported, the shipping method stored in the order records is used.
- Update the tracking number with the one provided in the imported file, if any.
- Change the order status to “Shipped” if your import file contains a field that is mapped to the “Ship” field and if that field contains a value of “1”. If you don't want to update the order status, set it to “0” (see below for more information). The order will then remain on the “Batch Ship Orders” page.
- Send the “Order Shipped” email to the customer if your import file contains a field that is mapped to the “Send Mail ” field and if that field contains a value of “1” (see below for more information). If you don't want to send this email to the customer, set it to “0”.
To use this feature, select Batch Ship Orders from the Orders menu, and click on Import 'Order Shipped' Information. Then, follow the instructions listed below.
Preparing the import file
Properly preparing your data file prior to importing it into ProductCart can save you a lot of time (and headaches). The vast majority of technical support requests that we receive from customers that are using any of the Import Wizards contained in ProductCart are due to improper formatting of the file to be imported. For example, users often forget to define the import range in their Microsoft Excel file (please see below for details on how to do so).
You can import shipping information using the following file types:
- Microsoft Excel (*.xls)
- Comma Separated Value (*.csv)
Please see the section of the documentation that covers properly formatting the import file when importing products. The same instructions are valid for this import feature.
Carefully review the requirements for each field so that you will not run into conflicts when mapping the fields. In addition, we strongly suggest that you remove columns that do not contain data, so that the file that you upload to ProductCart is smaller in size and mapping is less confusing. And you may also want to rename the column headings so that they can easily be recognized when mapping the fields.
The vast majority of technical support requests that we receive from users of ProductCart that are not able to successfully import an XLS file are due to improperly setting the IMPORT range. If you are experiencing problems, please review the steps outlined above to make sure that the IMPORT range has been properly defined, and that empty columns have been removed.
Fields Description
Import Steps
Step 1: Upload the file
Now that you have prepared your Ms Excel or CSV data file for importing it into ProductCart, select Manage Orders > Batch Ship Orders and then on the Batch Ship Orders page click on Import 'Order Shipped' Information Wizard. Follow the instructions listed below to use this feature.You can either upload the data file through the Import Wizard or via FTP (recommended for large files). If you choose to upload the file through the Import Wizard, browse to the file and then click on the Upload button. The form is validated to make sure that only *.XLS and *.CSV files are uploaded to ProductCart.
If you prefer to use FTP, you must place the file in the pc/catalog folder and then enter ONLY THE FILENAME in the field provided. ProductCart will verify that the file exists on the server before proceeding to Step 2.
The next screen will remind you that order information is only updated when the order number(s) in your import file match an existing order number in your store database. Click on Go to Step 2 to proceed to the next screen.
Step 2: Map the fields
ProductCart will now ask you to map fields between your import file and the store database. Your import file’s column headings are listed on the left side and ProductCart’s on the right. Carefully map each field. Leave blank the ones for which you do not have any information to import. Note that the following fields are required:- Order ID
- Ship
- Send Mail
If any of these fields are not mapped, you will receive an error message and will be prompted to map them.
Make sure that you don’t map the same field twice. If you do so, ProductCart will return an error message and will prompt you to verify that all fields are mapped uniquely.
Step 3: Confirm mapped fields
Next, ProductCart shows you the fields as you have mapped them. Verify that the information is correct, and then proceed to the next step. Otherwise, go back to Step 2 and change the incorrect mapping settings. ProductCart will now start populating the database. Depending on the number of records that you are importing, this task may take several minutes.Step 4: Import completed
For each successfully imported record, ProductCart will perform the tasks listed at earlier in this chapter. That is:- Update the shipping date, if necessary.
- Update the shipping method, if necessary.
- Update the tracking number, if any is provided.
- Change the order status to “Shipped”, if you files instructs it to do so.
- Send the “Order Shipped” email to the customer if your file instructs it to do so.
"Undoing" the last product import/update
ProductCart allows you to easily “undo” an import/update by reverting back to the data that was stored in the product database before new data was imported or updated. If you make a mistake, you can quickly revert to the previous order status by using this feature. Note, however, that if an e-mail was sent out to the customer, that task cannot be undone.When orders are imported or updated, ProductCart saves a log of what information was imported in the files importLogs/ship-prologs.txt. The system uses this information to remove the data that was imported/updated.
To undo the last import/update, start the Import Wizard again, and then click on the Undo Last Import button. You can only undo the last import.