Overview
ProductCart gives you the ability to cross-sell items on your store. Cross-selling can help you increase your sales by presenting customers that are in the process of buying a certain product with a number of related products in which they may also be interested. Most large e-commerce stores use this marketing tool, and in a variety of ways. ProductCart also allows you to create product bundles, which let you promote the purchase of related products by offering a discount when the products are bought together.
Settings
Under Marketing, click on Manage Cross Selling, then select the Cross Selling Settings link to specify how you would like to use ProductCart’s cross-selling feature on your store. The page that is displayed allows you to set the following options:
- Turn cross selling on/off: This option allows you to turn the feature on or off. This way, you don’t have to remove relationships that you have set between products in case you opt not to have cross selling active on your store for some period of time.
- Show related products on product details page: If set to ‘Yes’, then N products related to the selected one will be shown on its product details page. N is the number of products that have been associated with the primary product. Related products are displayed at the bottom of the product details page, below the Add to Cart button, but above the Long Description if the product has both a short and a long description.
- Show related products when adding to cart: This option defines whether related products should be shown on the shopping cart page (pc/viewcart.asp). If set to ‘Yes’, then N products related to the ones that have been added to the shopping cart will be displayed. They are displayed below the shopping cart content, at the bottom of the page.
If there two or more products in the shopping cart, and two or more of them have cross selling items assigned to them, ProductCart will display the items associated with all products in the cart. However, if there are overlapping cross-selling relationships (same product has been assigned to two or more of the items currently in the shopping cart), those items will only be shown once. Product bundles are not shown in the cross-selling section of the View Shopping Cart page. - Show product thumbnails? (If “no”, text links appear): This setting defines whether related products should be shown with their respective thumbnail images or not. If product thumbnails are used you can set the following two properties to force an image size that is smaller than the actual thumbnail size:
- Thumbnail height: In pixels, enter “0” to preserve the actual image size
- Thumbnail width: In pixels, enter “0” to preserve the actual image size
- Text to show: Enter the text that you would like to display right above the related products. For example, it could say something like: ‘Customers that have purchased this product have also liked…’. The text is limited to 250 characters.
The settings described above apply to all cross selling relationships shown in the storefront. You can override some of those settings at the product level. To do so, create a cross-selling relationship for one of your products as indicated below, then go select Marketing > Manage Cross Selling > Existing Relationships. From there, click on View/Edit for the product whose cross-selling you wish to customize. On the bottom of the edit page, click on Edit Product-specific cross selling settings. Note that you can only edit settings that apply to the product details page, not the ones that apply to the shopping cart page since that page is not “product-specific”. Click on Remove Product-Specific Settings to go back to applying the storewide settings to that cross selling relationship.
Creating a Cross Selling Relationship
Set-Up
The next step is to create relationships between products. Select Marketing > Manage Cross Selling > Add New Relationship. At this point ProductCart will take you through a multi-step process to set up a new relationship between a primary product and its cross-sell items.- Step 1: Search for the primary product using the familiar product search feature.
- Step 2: Find and select products related to the primary products. You can select products shown on different search results pages. Just check the checkbox next to all the products that you want to assign to this cross selling relationship.
- Step 3: Set the sort order in which related products will be shown on the product details page. This gives you flexibility when displaying cross-sell items as you can place the ‘strongest’ candidate for a cross-sale at the top of the list. Note that if you create bundles between the primary product and one or more of the sub-products, those bundles will always been shown in a separate section of the page, before all other cross-selling items, regardless of the sorting criteria that you entered on this step.
- Step 4: Complete the ‘wizard’ and view the details of the cross selling relationship that you have just created. Let’s look at the different features that are available to you on this page.
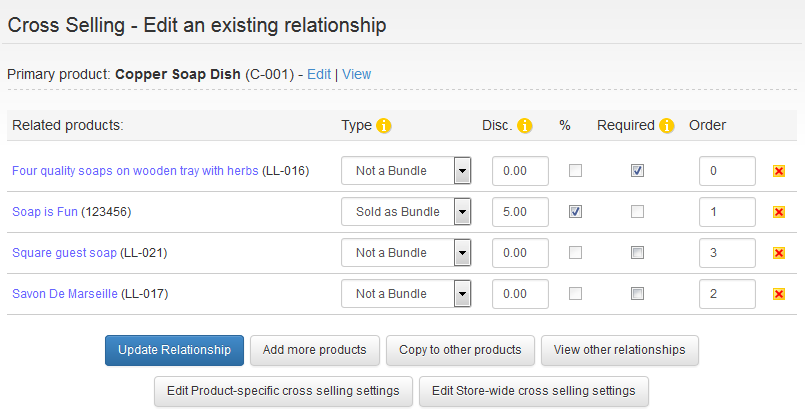
The top of the page shows the name of the primary product. Click on View to see a preview of how the cross selling relationship looks in your storefront, on the product details page.
The left side of the page lists the cross-sold items (related products). Click on the product name to open the Modify Product page in another window in case you need to edit any of those products.
The second column contains a drop-down menu that allows you to specify the type cross selling relationship. You can create two types of cross-selling relationships for your products:
- Sold as Bundle: Bundling allows you to encourage customers to purchase two products instead of one by providing a discount when they are purchased together. It also helps you highlight the product that is bundled with the product originally selected by the customer. For more information about product bundles see the corresponding section later in this chapter.
- Not a Bundle: Choose this option if you simply want to promote cross-selling items, without proposing that they are purchased with the primary product as a bundle (e.g. a bundle might not make sense to the customer). These products are shown separately from bundled products on the product details page.
Multiple Cross-Sold Products
Overview
Multiple cross-sold products can be added to the cart together with the main product. To do so, customers will check the checkbox located underneath the products that they wish to purchase. The checkbox is not shown if a product has required options that the customer needs to select.
Required Accessories
When you check the Required option on the Edit Existing Relationship screen, the checkbox will be automatically selected and cannot be de-selected by the customer. This feature is useful when you are selling products that require the purchase of another product (e.g. a required accessory). If a customer adds the original product to their shopping cart, the "required accessory" will automatically be added as well. They will not be able to remove the required accessory from the shopping cart without removing the original product it was cross-sold under.
Other Tips
You cannot enter a discount on required accessories or "Not a Bundle" items. You can only do so on "Sold as Bundle" items, in which case, it is required.
Use the Order column to rearrange the order in which the cross selling items are displayed.
Remember to click on Update Relationship to save any changes. Click on Add Products to add more products to the relationship. Click on the Remove link to remove a product from the relationship.
Cross Sold Items and Accessories in the Storefront
See the following example to see how three different types of cross sold items are displayed on the product detail page.
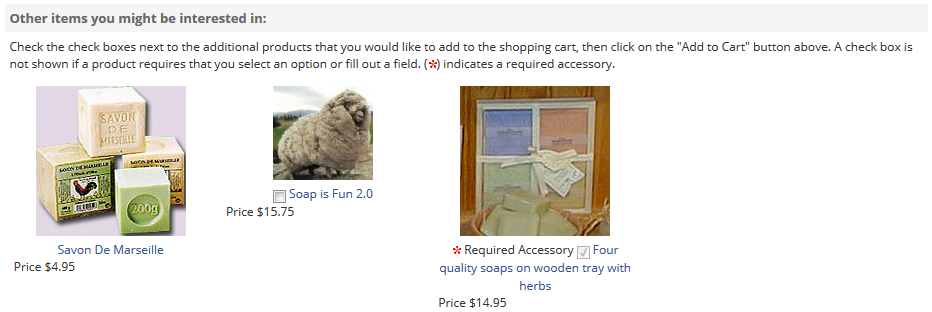
In the storefront, cross sold items can be added to the shopping cart by the customer by checking the checkbox displayed underneath each product (middle item in the above example). If a checkbox is not available, product options have been assigned to it: the customer must view and select those options before being able to add the item to the shopping cart (first item in the above example).
If you edited the cross selling relationship to make an item a required accessory, the first checkbox would be checked by default and grayed out (so the customer cannot uncheck it). The text “Required Accessory” would also be shown, together with a required icon (third item in the above example).
If you want your customers to be able to select options on a product (as mentioned in the previous example where a checkbox does not appear for a cross sold product), make sure that product is NOT a required accessory.
When a product is added to the cart and one or more accessories are required, a message on the View Shopping Cart page (pc/viewcart.asp) notifies the customer explaining that "Please note that we have added to your shopping cart additional products that are required by <Primary Product Name>" (see below):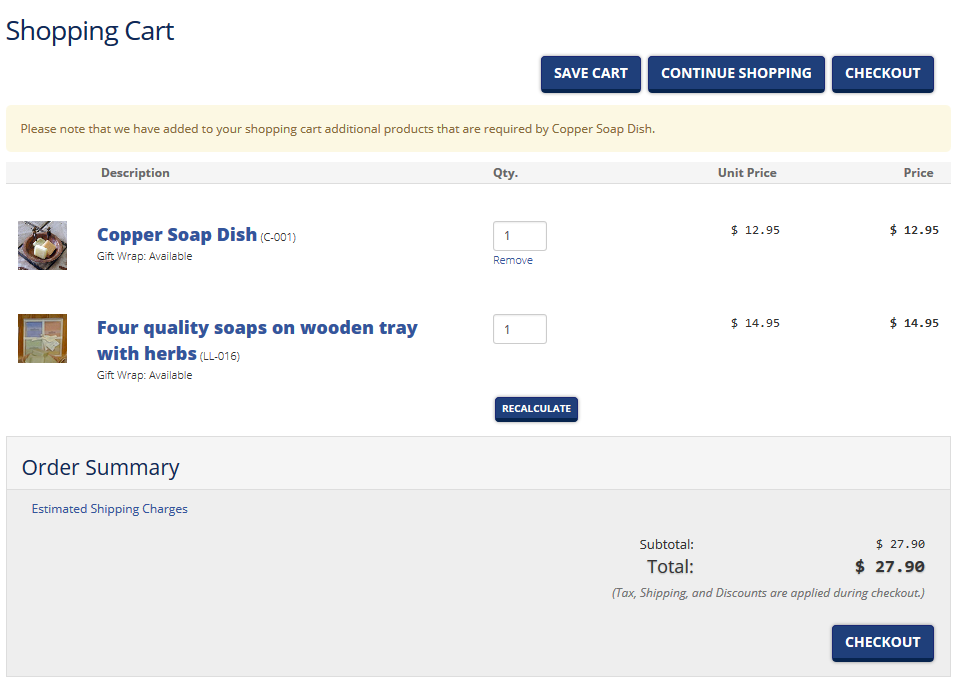
Note that there is no "Remove" button beneath the required accessory that was automatically added to the shopping cart when the main product was added. The only way for the customer to remove this item from their cart is to first remove the main product.
When cross selling products are displayed on the shopping cart page, checkboxes are not shown as you cannot add a product to the shopping cart from that page.
Product Bundles
How They Appear to the Customer
When you set up a cross-selling relationship as a bundle and enter a discount for purchasing the bundled items together, ProductCart will display the two bundled products (primary product + cross-sold item) in a special area of the page, above other cross selling items, as shown below: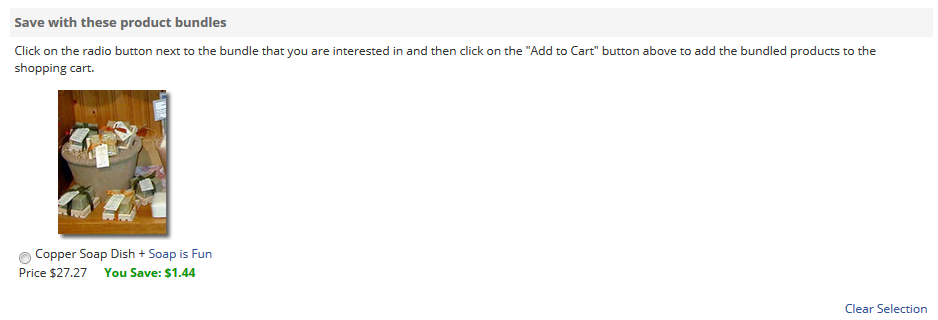
Customers can either add to the cart the primary product by itself or the bundled products together. To do so, they will select the radio button located below the bundle that they wish to purchase, and then click on the Add to Cart button. A radio button is used instead of checkboxes because customers cannot add to the cart two bundles at the same time.
NOTE: The bundled products will not show up on the product detail page unless you enter a discount for purchasing the bundled items. If you do not wish to enter a discount, you can still opt for that item to be cross-sold with that product, but you will have to select "Not a Bundle" and it will simply show up within the suggested similar items section.
Why Bundle Your Products?
Bundling allows you to promote the sale of a related product that customers might not have known about, or that they might not have considered purchasing together with the primary product. Providing a discount on the bundle increases the incentive to purchase both products. The discount can be a set amount or a percentage off the sum of the two product prices. Discounted bundles can help you increase the Average Order Amount , which is a great way to increase sales on your store.
Divide the total sales for the last couple of months by the number of orders you received during the same period: that’s your Average Order Amount. If you can get that number to increase (e.g. by using a tool like product bundling), you can automatically increase sales even if the actual number of orders remains the same.
Giving a Discount for Bundling
On the Edit Existing Relationship page, when you select Sold as Bundle from the drop-down for any of the Related Products, the Discount input field becomes available (you cannot edit it otherwise). This section is required in order to bundle a product. Enter a number indicating the discount that you want to offer when the bundle is purchased. For a percentage discount, check the % checkbox. Otherwise, leave it unchecked. For example, if you enter “5” you store will give a $5 discount on the purchase. If you check the % checkbox, it would instead treat it as a 5% discount. The discount on the bundle is shown on the product details page to let customers know that it is available with the words "You Save ($N)."
How Bundled Products Appear in the Shopping Cart
Both bundled products will appear in the shopping cart at regular price. There will be a line that displays "Product Bundle Discount: $-N" and a line titled "Product Subtotal" will display the discounted price of the bundle.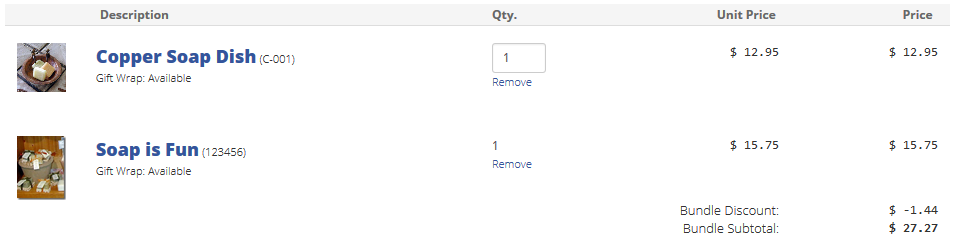
If a customer removes one of the bundled items, the second item is not removed from the shopping cart. However, the discount is no longer applied.
Other Important Information about Bundled Products
Please note the following limitations about product bundles:
- You can only bundle two products. You cannot create a bundle that includes three or more products. If you are looking at selling multiple, bundled products (e.g. a gift basket), then you might want to consider using a Configurator product.
- Bundled products will not be displayed…
- if the cross-sold product is not active
- if the cross-sold product has one or more required product options (which means that the customer must enter some information on the product details page before being able to add the product to the shopping cart). If the options are not required, the bundle will be shown.
- if the item is an Apparel product: bundles are not compatible with Apparel Products