Manage Sales
We approached this feature with the goal of minimizing code changes in the ProductCart storefront so that chances of introducing problems in the many areas where price calculations are performed would be minimal. In addition, we did so to make it easier for people that have modified the ProductCart source code in those areas to be able to take advantage of this feature without a major recording effort.To accomplish these goals, product prices are not edited, but rather replaced when a sale is started. Specifically:
- Existing prices are backed up to a separate database table
- Non-sale prices are replaced with the sale prices
- The storefront uses the same price, which is now a sale price
Creating a New Sale
You can create a new sale from scratch or clone a previously run sale, if any. The cloning feature allows you to quickly create a sale that is very similar (or maybe identical) to one that was run in the past. A friendly wizard will guide you through the steps of creating a new sale.
To create a new sale from scratch: from the Marketing menu, click on Manage Sales > Create New Sale
Choosing Products
The first step is to specify which products will be affected by the sale. ProductCart will display a search form that allows you to locate products that will be included in the sale. Don't worry if you cannot locate all the products you wish to include in the sale with just one search: you will be able to edit the products included in the sale later.
- Use the search filters to locate the products to be included in the sale
- On the search results page, all products are checked, so you can easily add them all to the sale by clicking on the Add to the Sale button
- If there are products listed in the search results that should not be added, uncheck them
- If multiple pages of results are returned, you can check/uncheck products on any of them before clicking on the Add to the Sale button. ProductCart will remember your selections as you navigation from page to page
Defining the Sale
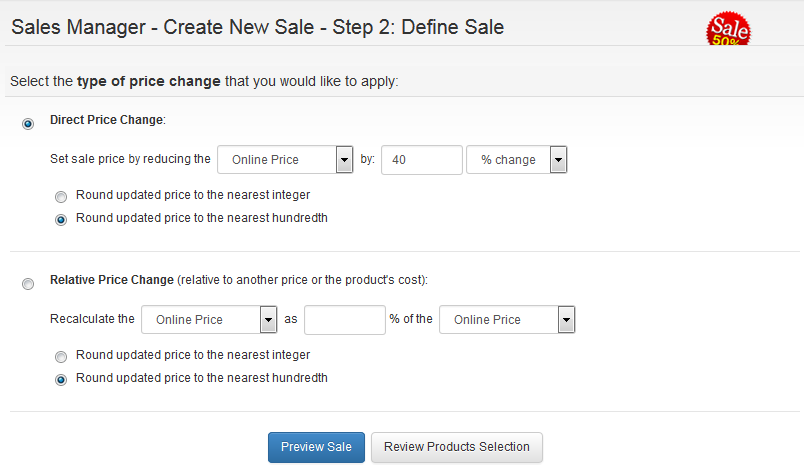 The next step is to define how product prices will be affected as part of the sale. You can choose between two types of prices changes:
Direct Price Change
- The calculation only involves one price: you are “directly” modifying that price.
- Select the price that you want to affect with the sale (the ”target” price). Typically, it will be the Online Price. However, you could also create a sale that is reserved to wholesale customers, or to a specific customer pricing category (e.g. preferred customers, resellers, etc.).
- Indicate how much the target price will change: it can be a percentage amount or an absolute amount
- Specify whether you want the resulting price to be rounded to the nearest integer or the nearest hundredth
Relative Price Change (relative to another price or the product's cost):
- The calculation involves two prices: the target price and the price used to calculate the change in the target price. For example, you could create an aggressive sale where you are selling certain products barely above their cost: online price = 20% over cost.
- Select the price that you want to affect with the sale. Typically, it will be the Online Price. However, it may a different price, as mentioned above.
- Select the price based on which you want to recalculate the target price
- Indicate the percentage change (e.g. 50% off the List Price, or 120% of the Cost)
- Specify whether you want the resulting price to be rounded to the nearest integer or the nearest hundredth
Don't worry too much about the settings you enter on this page:
- The sale is not live until you start it
- You will be able to preview the price changes
- You will be able to change these settings at any time while the sale is “Pending” (has not yet been started)
Previewing the Price Changes
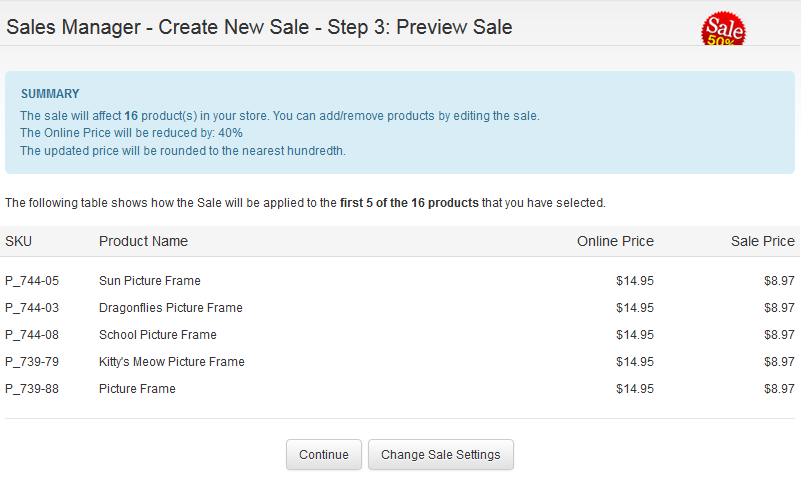 The next step give you a quick preview of how prices will change with this sale. ProductCart picks 5 products from the ones you selected for the sale, and shows you how the price will be affected. The top part of the page provides other summary information on the sale, such as how many items will be affected.
If the price change is not what you expected, click on “Change Sale Settings” to return to the screen where you can define the price change.
Describing and Saving the Sale
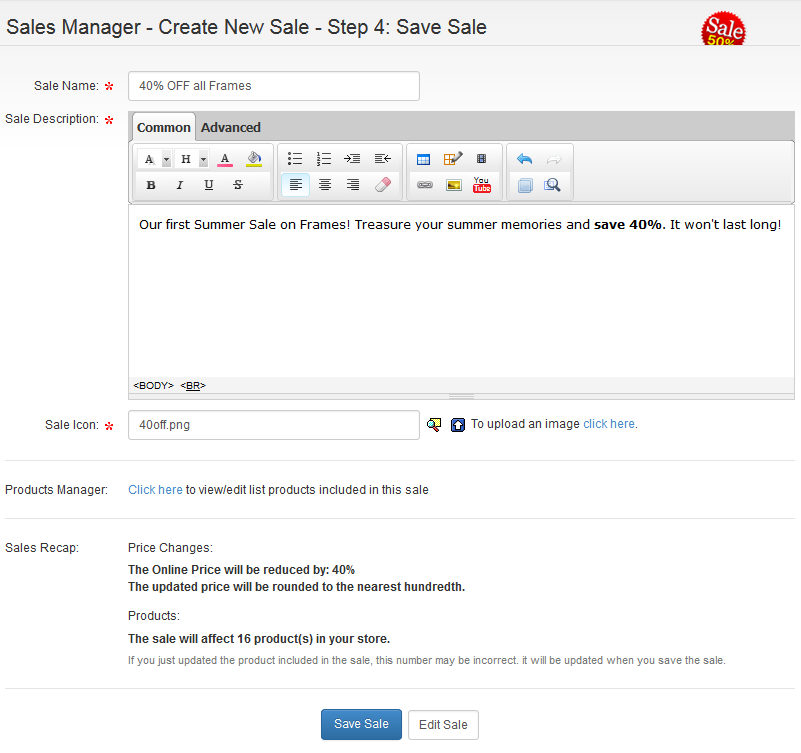
- Sale Name - Enter a short name for the sale. It will be used both in the storefront and in the Control Panel
- Sale Description - Enter a description for the sale. Use the HTML editor to format it and insert links (e.g. to the official Terms and Conditions of the sale, which you can create using Content Pages).
- Sale Icon - Upload a small icon (GIF, JPEG, PNG): the image file will be saved to the “pc/catalog” folder and the file name will be copied to the input field automatically. If the image has already been uploaded to your store, you can use the image search feature to locate it.
- Products Manager - Allows you to view and edit the products included in the sale. You can edit the list later, before you start the sale.
- Sales Recap - Provides a summary of the sale settings.
Sales Statuses
 After clicking "
Save Sale," you will be redirected to the "
View/Edit Pending Sales" page where you can click "
Start Sale Now".
After clicking "
Save Sale," you will be redirected to the "
View/Edit Pending Sales" page where you can click "
Start Sale Now".
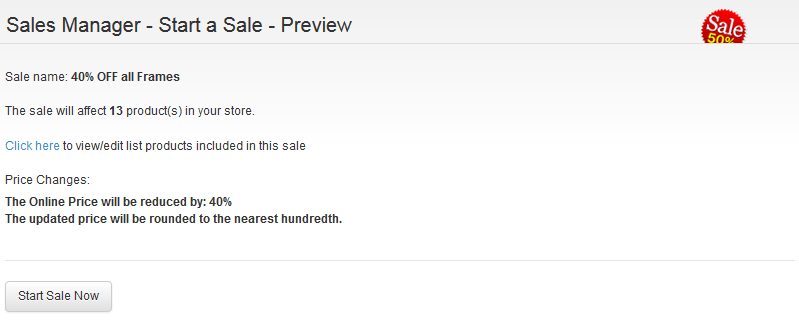
If you would like to come back to start this sale later, you can navigate to this page by selecting Sales Manager > View & Edit Pending Sales from the Marketing menu to view a list of Pending sales. Click on the green square icon to the right to start a sale. You will be shown a brief sales summary, which gives you a final chance to confirm that everything looks OK, and to make changes, if you need to.
If the number of products shown is different from the number of products you originally selected, the reason is that some of those products must still be part of another active sale. You have 3 options:
- Stop the other sale
- Start the current sale with the products that are not already included in other, running sales
- Wait to start the current sale until the other sale has been stopped

You will need to stop sale A or change sale B in order to continue.
If no error message is shown, clicking "Start Sale Now" will lead you to a processing page that lets you know the sale is live.
Viewing & Editing a Live Sales
Select Sales Manager > Current & Completed Sales from the Marketing menu to view a list of sales that are currently running. When a sale is Live, you can:- View - but not edit - the items that are on sale
- Edit the sale name, description, and the icon used in the storefront
- Stop the sale
- View a list of orders placed for items that are on sale
Stopping a Sale
Select
Sales Manager > Current & Completed Sales from the
Marketing menu to view a list of sales that are currently running or have recently been completed. Click on the
Stop icon to stop a sale that is currently running. When a sale is stopped:
- the prices that had been backed up are now restored
- you can no longer edit the sale is any way
- you can clone a sale to restart an identical or similar sale
Troubleshooting Stopping a Sale
On a couple of occasions we have had reports of problems stopping a sale. This appears to have happened when “back” was selected at some point during the activation of the sale.There is a “trick” that you can use to call up the page in the ProductCart Control Panel that will allow you to Stop the Sale. First, you need to find the “ID” of the sale, which you can do by hovering over one of the links related to the Sale. So, for example… if the ID of the Sale that is in “limbo” is '11', then you would login to the ProductCart Control Panel and paste the following link into the browser address field and press [Enter]:
www.yourstore.com/shop/pcadmin/sm_stop.asp?a=stop&id=11
Replacing all the URL before the "sm"_stop with that appropriate for your store. Note that the “pcadmin” directory has probably been renamed, so you will need to substitute that. After pasting the above link into your browser, you should be able to Stop the Sale.
Archiving a Sale
As you complete a large number of sales, you may want to archive older ones to “clean up” the Current & Completed Sales window. To archive a sale, click on the corresponding icon. The “Archive” icon is only shown once the sale has been completed. An archived sale:- Is no longer shown in the Current & Completed Sales window, but rather in a separate Archived Sales screen
- No longer contains details about the individual products that had been on sale. Instead, it displays the message: ”NOTE: this sales has been archived. The system no longer has detailed information on the products that were included in the sale”
- The View Archived Sales button on the Current & Completed Sales page is only shown when there are archived sales
Sales in the Storefront
There are many ways for your store visitors to notice the existence of a sale:- The sale icon is shown whenever a product that is on sale is displayed
- The “Specials” page lists all running sales at the top (name, description)
- Sales become filters on the advanced search page, which means that you can choose to only view products that are currently on sale (and specify which sale).
- The sale icon is shown whenever a product is listed with other products or displayed on its own. In he image below, you can see it next to the online price, which already reflects the discounted price.