Tracking store orders with Google Analytics
If you have not upgraded to new PayPal Commerce or using the GA4 Update, this is one way to track purchases using the older Analytics Implementation with Google Tag Manger.
This is where the integration between ProductCart and Google Analytics becomes a lot more interesting. ProductCart will take care of notifying Google Analytics that an order has been placed and will provide Google's Universal Analytics with the transaction information. This will enable you to better understand where your shopping cart orders are really coming from.
NOTE: If you are using the new Google Analytics 4 (GA4), you will need to set up it up through Google Tag Manager (GTM) and use your GTM container ID in your ProductCart control panel for tracking.
NOTE: Google has announced that Universal Analytics would be discontinued after July 1, 2023 and will be proceeded by Google Analytics 4 (GA4). ProductCart can integrate with GA4 through Google Tag Manager (GTM).
TRACK PURCHASES WITH GOOGLE TAG MANGER
Step 1: Log into your GTM Account and then open the container setup under your website’s name.
Step 2: Click the “New Tag” link on the “Overview” page or click on “Tags” in the left-hand navigation, then click the "New” button. If you don’t’ see this as an option, then you may not have ADMIN permissions set for your email address associated with this GTM account. Request permission from the Administrator of the account if this is the problem.
Step 3: When opening a new tag, give the name of the tag something like “Purchase Event” then:
-
Under “Tag Type,” select “Google Analytics: GA4 Event”
- Under “Measurement ID,” past your GA4 Measurement ID.
- Under “Event Name” type "purchase" lowercase.
NOTE: Make sure you have set up a Google Tag for this property as well, or your tracking may be affected.
CREATE TRIGGER FOR SUCCESSFUL UA ORDERS
Step 1: Click on the “Triggering” box or on the icon in the center.
Step 2: Click the “plus sign” button at the top right.
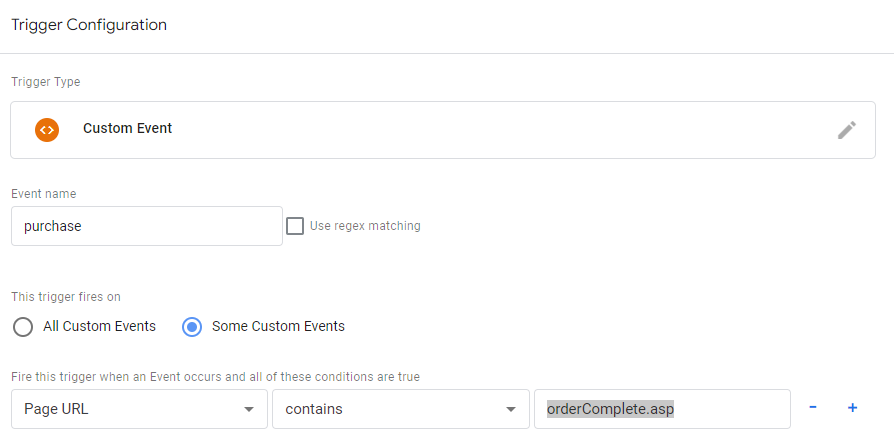
Step 3: Click “Custom Event” which is under “Other” for trigger types.
Step 4: Type lowercase “purchase” in the “Event Name” box.
Step 5 (Optional): Click the radio button for "Some Custom Events" and on the first dropdown box, select "Page URL" and type this exactly in the third/last box "orderComplete.asp" The middle box should have "contains"
NOTE: Step 5 is an optional step if you want to specify the exact page the order completes on. By default, orderComplete.asp is the success page after an order. You can even specify the trigger to fire when this page is viewed if the "purchase" event doesn't work in triggering the event. However, using pageview triggers can be less accurate then event triggers.
Step 6: Then click “Save.” 
SAVE TAG AND PUBLISH
After saving the trigger, you’ll return to the screen with all the tag options. On this screen, click “Save” for the Tag. After that you’ll see the list of tags you’ve created including your Purchase Event tag. Before you leave GTM, you must activate your changes by clicking the “Submit” button at the top right. Just add a brief Version Name and Description making note of adding a Purchase Event Tag and Trigger. After that, click the “Publish” button and your new tag will track successful orders moving forward. Know that it can take up-to 48 hours to see transactions show up in ecommerce reporting.
